flexAIserver - Overview
- Physical Installation
- Software Installation Guide Dell
- Software Installation Guide HPE
- Safety Information
Physical Installation
Note - The information below applies to the pre-configured flexAIserver hardware supplied by Jünger Audio. If flexAI is installed on different server hardware, refer to the manufacturer's documentation for model-specific installation, cooling, power, and safety requirements.
The pre-configured flexAIserver is a 1RU, 19-inch rack-mount server intended for installation in a standard equipment rack.
Install the server using the appropriate rack-mounting hardware and make sure that it is adequately supported.
The server is actively cooled. Keep all ventilation openings clear and ensure sufficient airflow through the rack. Additional spacing above or below the server is normally not required unless specified by the server manufacturer or required by the cooling concept of the installation.
Power
The pre-configured flexAIserver is equipped with redundant power supplies.
Connect both power supplies for redundant operation. If one power supply fails, the remaining supply can continue to power the server.
For installations requiring high availability, connect the two power supplies to independent mains circuits whenever possible. Ideally, the circuits should also be backed by separate UPS feeds or other suitable backup power arrangements. This provides protection not only against a power supply failure, but also against the loss of one mains circuit.
Each power supply has its own mains connection and power control, depending on the installed server hardware.
Important - Please read Safety Information on proper grounding and electrical safety.
Software Installation Guide Dell
Installing flexAIserver
This guide describes two methods for installing the flexAIserver software on a supported Dell PowerEdge server:
- Method A: Installation from a bootable USB drive
- Method B: Remote installation using Dell iDRAC Virtual Console and Virtual Media
Both methods use the same flexAIserver installation image. Once the installer has started, the remaining installation procedure is identical.
Prerequisites
Before starting the installation, make sure the following are available:
- flexAIserver ISO image. The ISO may be supplied inside a ZIP archive and must be extracted before use.
- Access to the Dell PowerEdge server.
Required BIOS and iDRAC Settings
Before installing flexAI, verify that the following server settings are configured correctly.
| Necessary Setting |
|---|
| Configuration → BIOS Settings → Boot Settings → Boot Mode = **UEFI** |
| Configuration → BIOS Settings → System Profile Settings = **Performance** |
| Configuration → BIOS Settings → Processor Settings → Virtualization Technology = **Enabled** |
| Storage → Virtual Disks → Layout = **RAID-1** |
| iDRAC Settings → Connectivity → Network → IPv4 Settings → DHCP = **Enabled** |
| iDRAC Settings → Connectivity → OS to iDRAC Pass-through → State = **Disabled** |
For Method A – USB, you also need:
- A USB flash drive
- Physical access to the server
- A keyboard and, if required, a local display
For Method B – iDRAC, you need:
- Access to the Dell iDRAC interface
- Permission to use Virtual Console and Virtual Media
**Important -** Installing flexAIserver erases the selected target disk. Make sure that the correct server and target disk have been selected before continuing.
Method A – USB Drive
1. Create a Bootable USB Drive
Use a suitable image-writing tool such as balenaEtcher to write the flexAIserver ISO image to a USB flash drive:
**Important -** Writing the ISO image erases all existing data on the USB drive.
When the USB drive is ready:
- Insert it into a USB port on the server.
- Connect a keyboard.
- Power on or restart the server.
2. Open the Boot Manager
During server startup, press F11 to open the Dell Boot Manager.
 Dell PowerEdge boot screen – press F11 to open the Boot Manager.
3. Open the One-shot UEFI Boot Menu
Select One-shot UEFI Boot Menu.
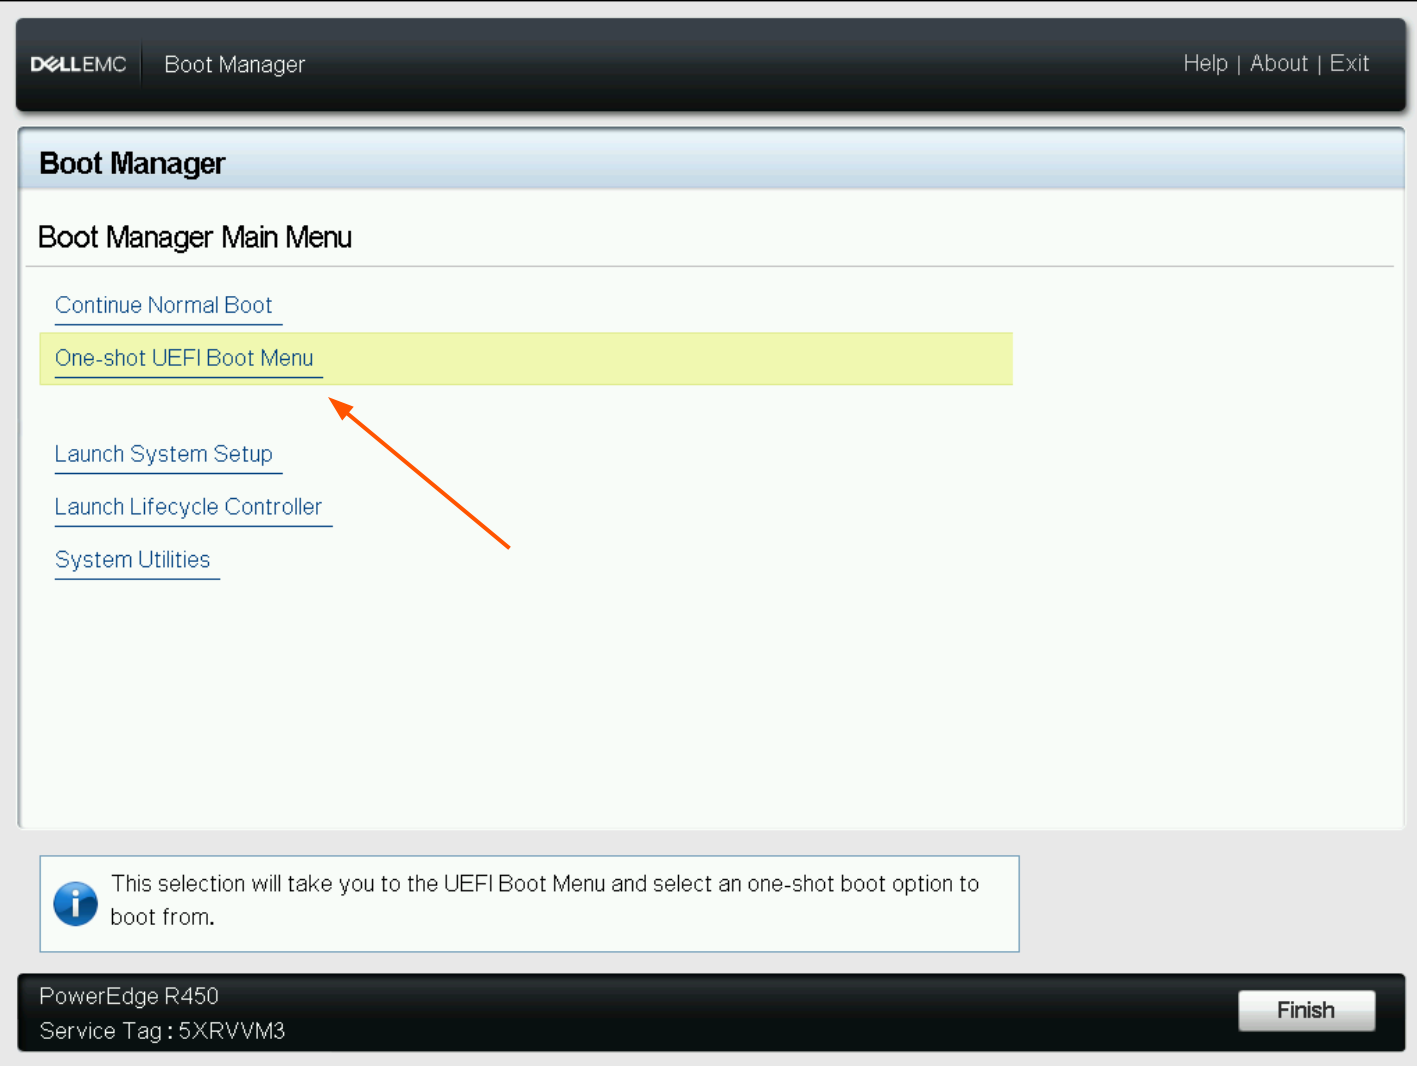 Boot Manager – select One-shot UEFI Boot Menu.
4. Select the USB Drive
In the UEFI boot list, select the entry corresponding to the connected USB drive.
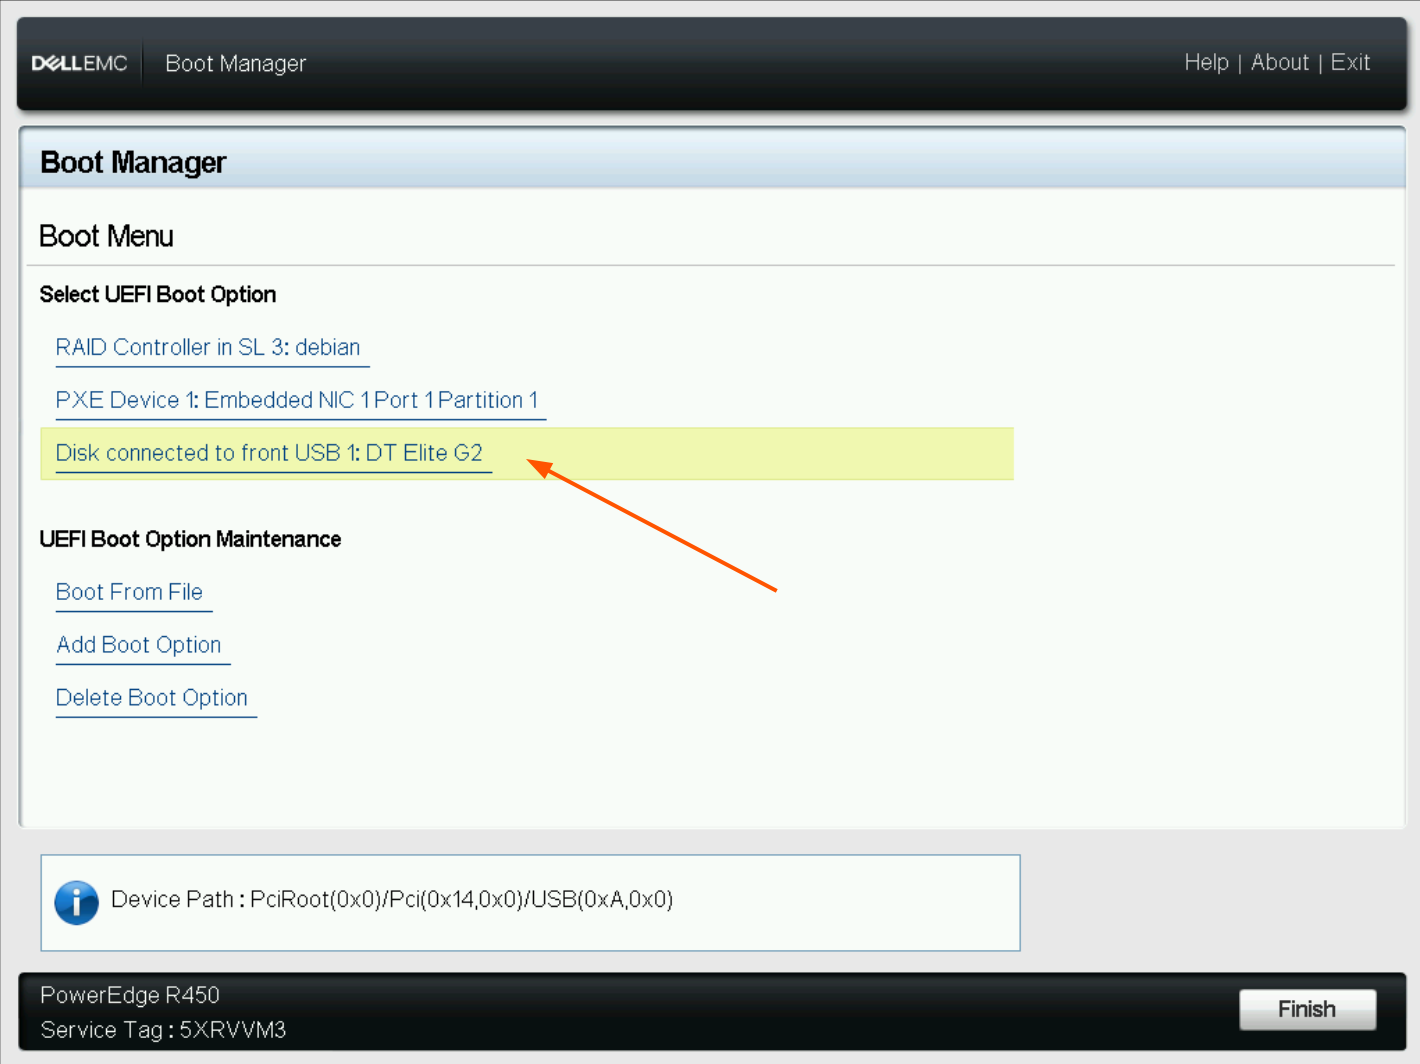 Select the USB installation drive. USB installation only.
Continue with Common Installation Steps below.
Method B – Dell iDRAC Virtual Media
1. Map the ISO as Virtual Media
Open the Dell iDRAC Virtual Console.
In the Virtual Console, open Virtual Media and map the flexAIserver ISO image as a virtual CD/DVD.
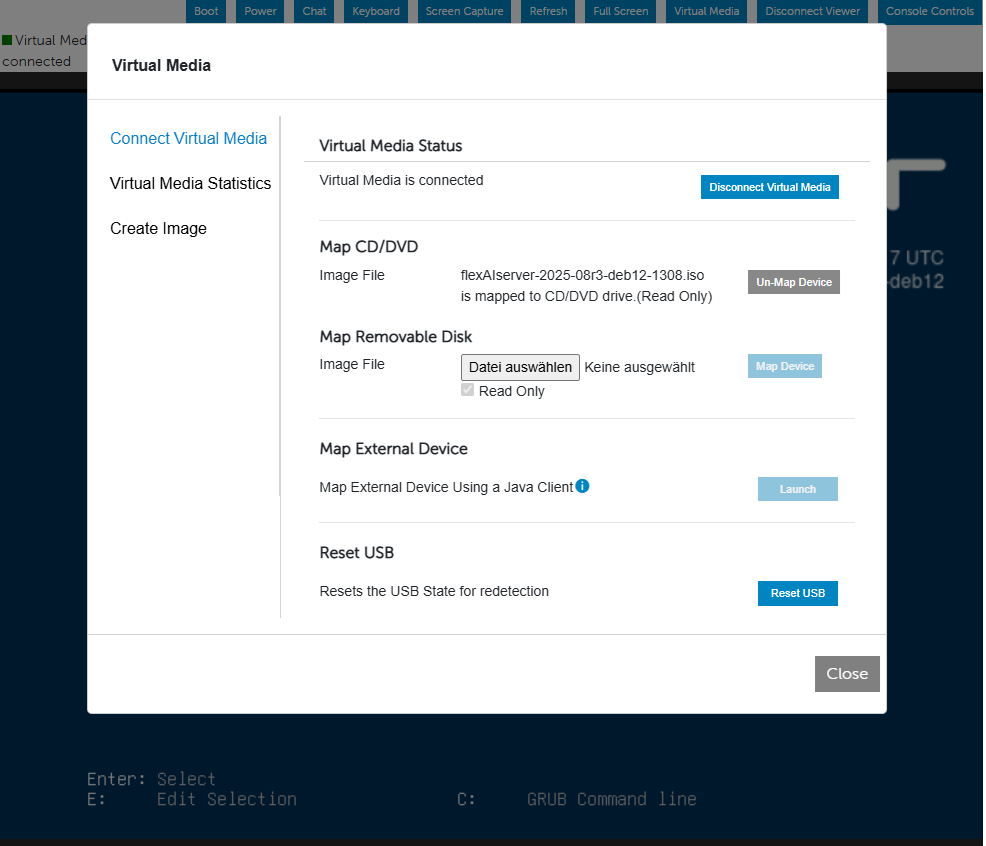 iDRAC – flexAIserver ISO mapped as Virtual CD/DVD. iDRAC installation only.
2. Restart the Server
From iDRAC, select Power > Reset System (warm boot) to restart the server and make the virtual installation media available during boot.
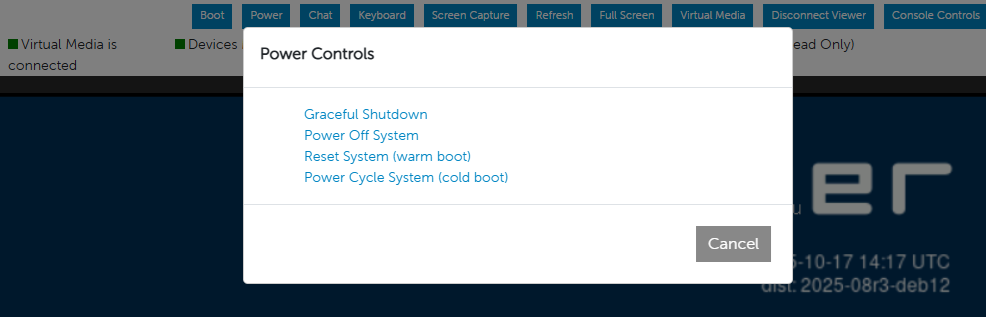 iDRAC – restart the server using Reset System (warm boot). iDRAC installation only.
3. Boot from the Virtual Optical Drive
During startup, open the Boot Manager, select One-shot UEFI Boot Menu, and then select Virtual Optical Drive.
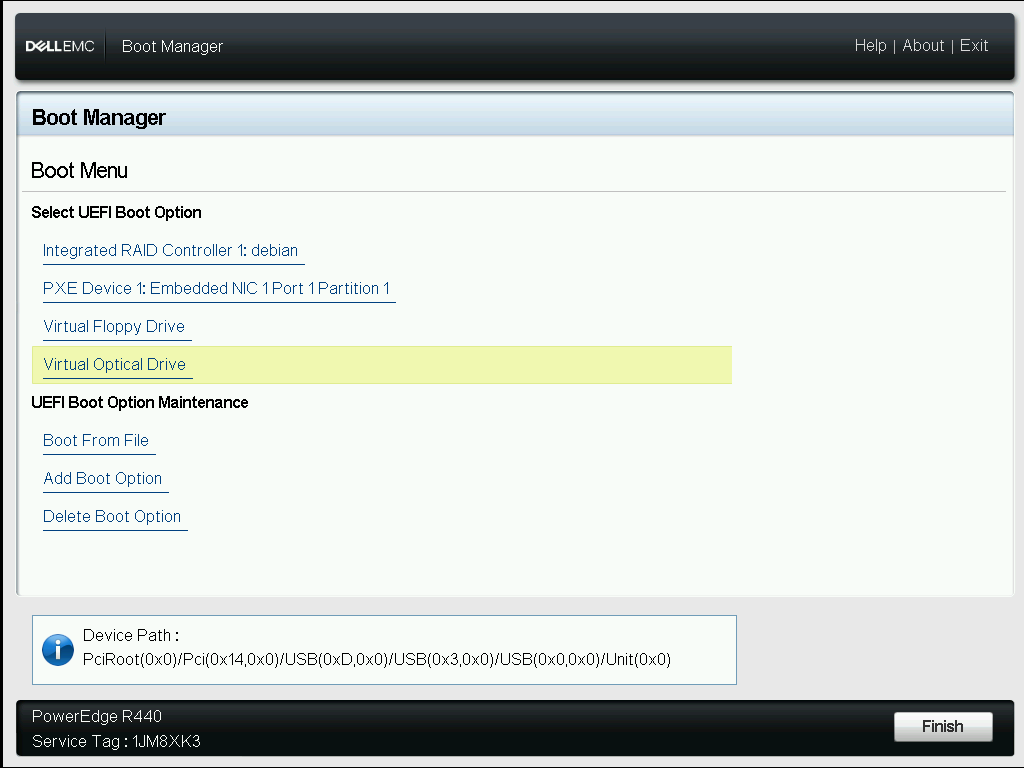 Boot from Virtual Optical Drive. iDRAC installation only.
Continue with Common Installation Steps below.
Common Installation Steps
The following steps are identical for USB and iDRAC installations.
1. Start the Installer
In the Jünger Setup menu (GRUB menu), select Graphical install and press Enter.
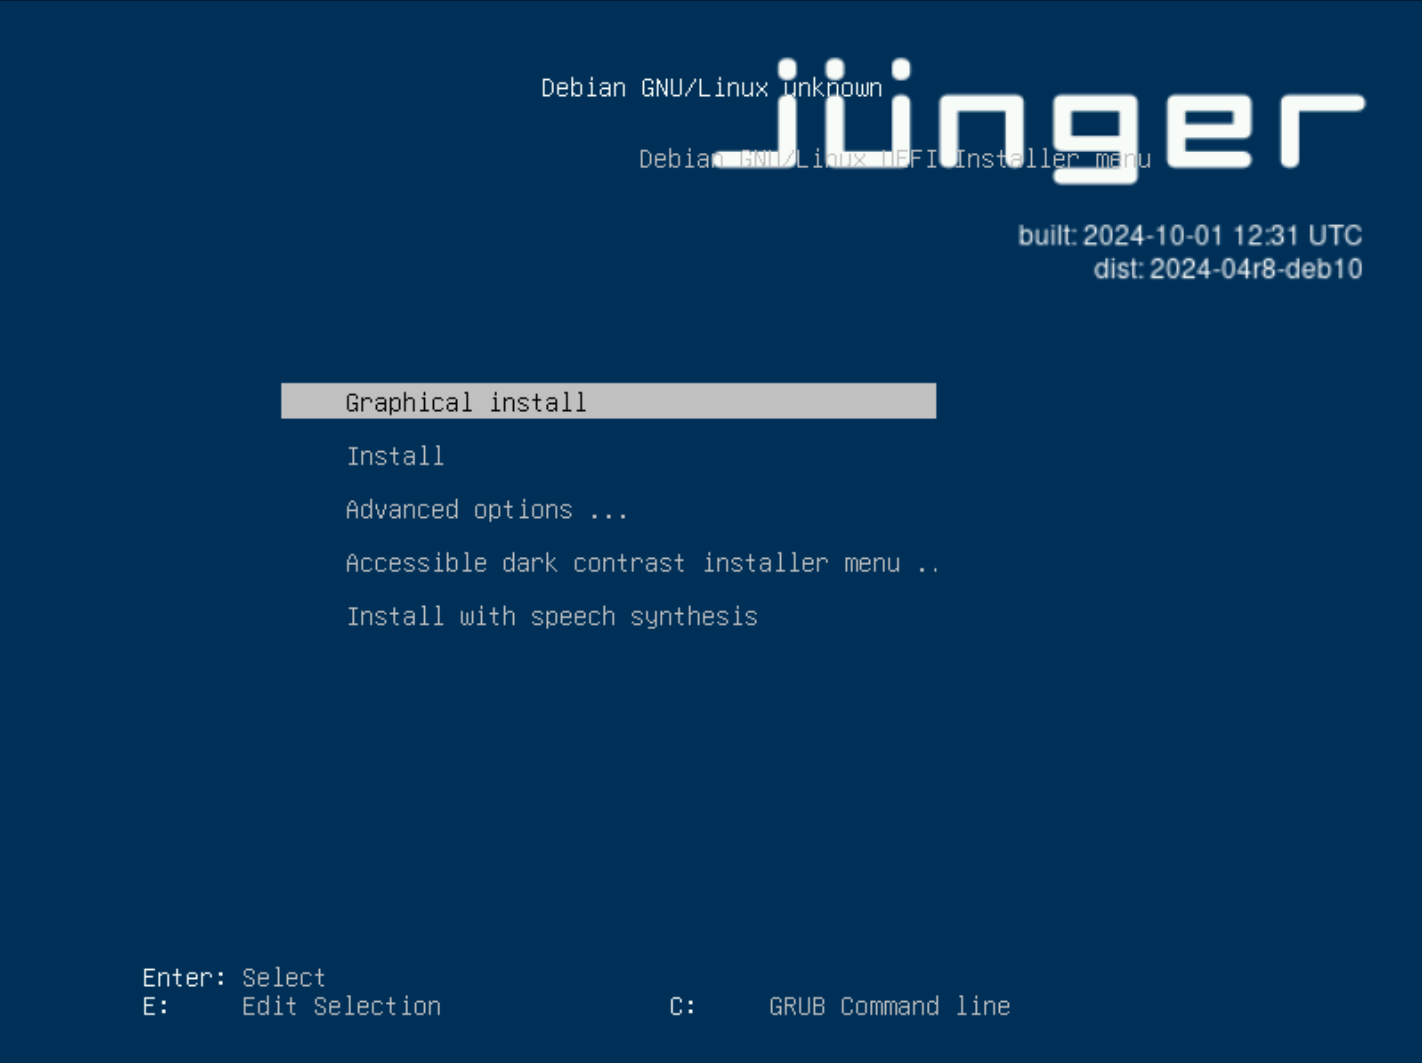 GRUB – select Graphical install. Applies to both installation methods.
2. Set the Host Name
When prompted, enter the host name to be used by the flexAIserver.
For a Jünger Audio pre-configured system, the host name can follow the device serial number, for example:
flexAIserver-00119
Alternatively, use a suitable host name according to the naming conventions of your network environment.
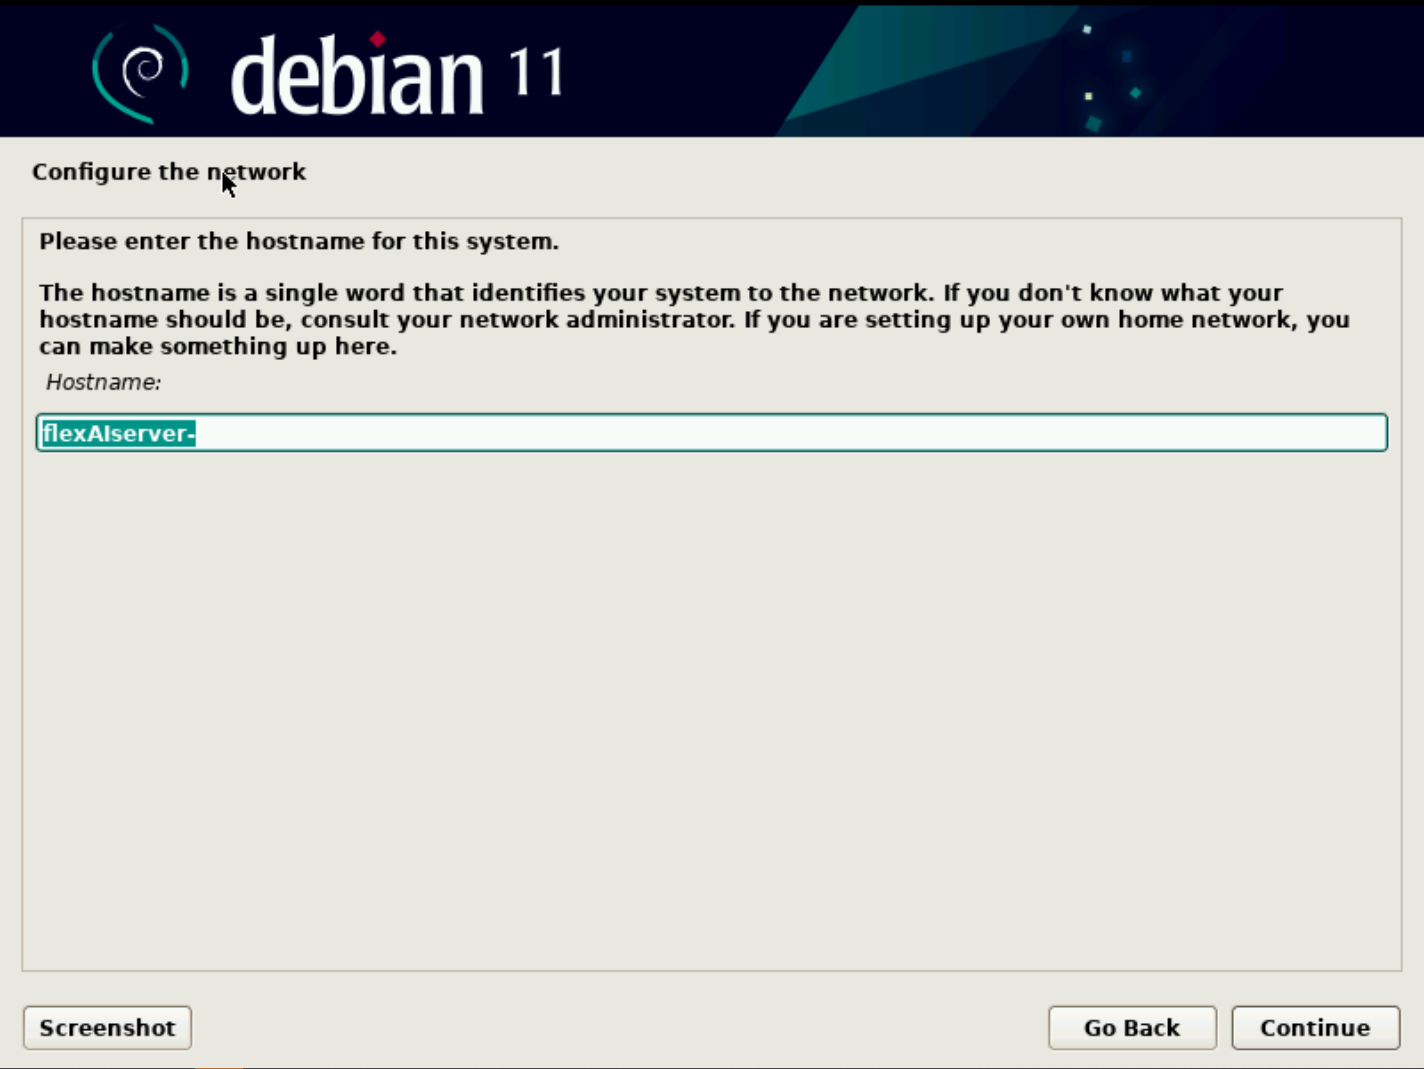 Enter the host name for the flexAIserver. Applies to both installation methods.
3. Select the Target Disk
Select the internal system disk on which flexAIserver should be installed.
On Dell PowerEdge systems with a PERC RAID controller, the internal storage may appear with a name such as DELL PERC.
If you encounter messages such as “Failed to create a file system” or “The following partitions are going to be formatted:”, select “Continue” and then “Yes” when asked “Write the changes to disk?”.
For USB installations, make sure that you do not select the USB installation drive.
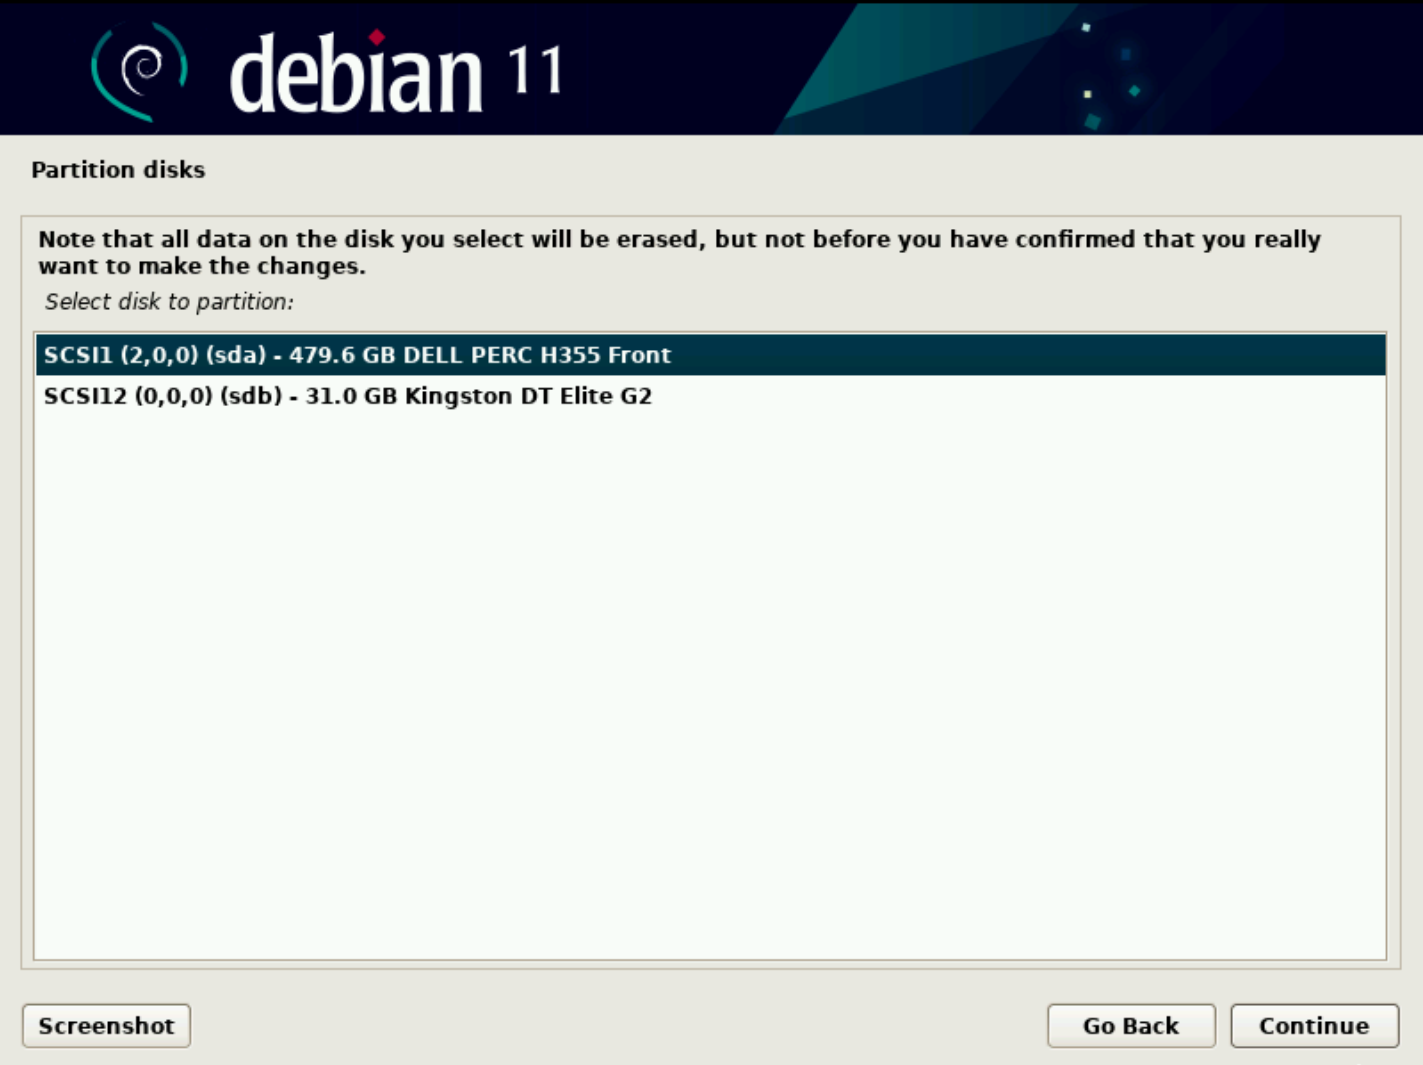 Select the internal system disk. Do not select the USB installation drive. Applies to both installation methods.
**Important -** All existing data on the selected target disk will be erased during installation. Verify the selected disk carefully before continuing.
4. Complete the Installation
Allow the installer to complete the installation process.
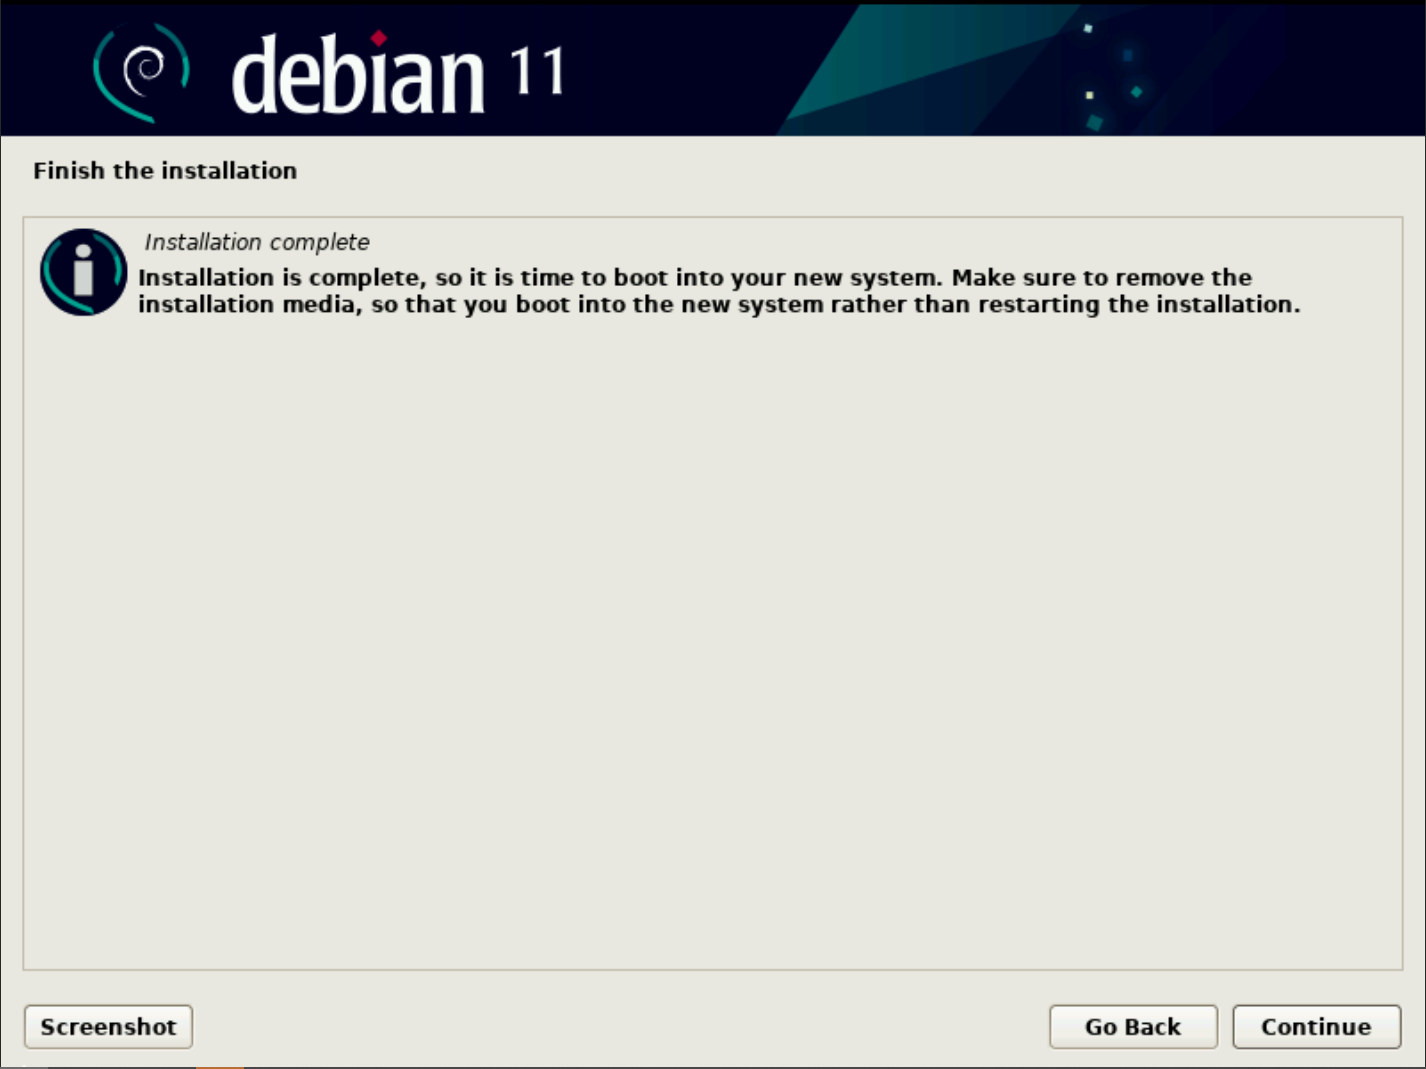 Installation complete. Applies to both installation methods.
Before rebooting:
- USB installation: Remove the USB installation drive.
- iDRAC installation: Unmap or disconnect the virtual installation media.
Restart the server and allow it to boot from the newly installed system disk.
Continue with the Initial Setup procedure to complete the flexAIserver configuration.
Software Installation Guide HPE
HPE ProLiant DL360 Gen11
This guide describes the initial hardware configuration and installation of flexAIserver on the qualified HPE ProLiant DL360 Gen11 platform.
The server can be configured locally using a VGA monitor and USB keyboard or remotely using HPE iLO.
Important - This guide applies only to the HPE ProLiant DL360 Gen11 server qualified for flexAIserver. Do not apply the server-specific RAID, BIOS, or remote-management instructions to other hardware platforms.
Prerequisites
Before starting, make sure the following are available:
- The flexAIserver ISO image. If supplied inside a ZIP archive, extract the ISO before use.
- Two internal SSDs installed in the server for the RAID1 system volume.
- For local access: a VGA monitor and USB keyboard.
- For USB installation: a USB flash drive with sufficient capacity. Its existing contents will be erased.
- For remote access: a network connection to the dedicated iLO port and access to the iLO credentials printed on the server top lid.
Warning - Creating the RAID volume and installing flexAIserver will erase data on the selected internal drives.
1. Initial Server Configuration
Access the Server
The server can be configured remotely through HPE iLO or locally using a monitor and keyboard.
Option A – HPE iLO Remote Access
- Connect a network cable to the port labelled iLO.
- For the initial connection, connect a monitor to the VGA port and power on the server.
- Note the iLO IP address shown during startup.
- Open the iLO IP address in a web browser.
- Log in using Administrator as the user name. The initial password is printed on the server top lid.
- In the iLO interface, open the Remote Console from the preview tile.
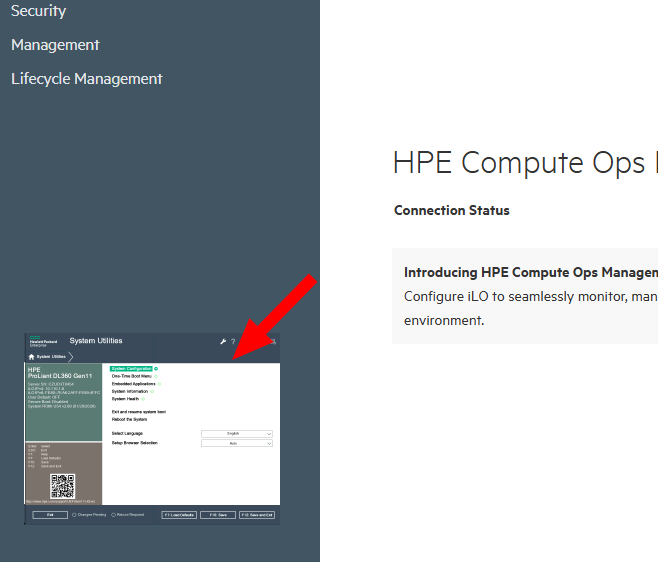
Launch the HPE iLO Remote Console from the preview tile.
Option B – Local Access
- Connect a monitor to the VGA port.
- Connect a USB keyboard.
- Perform the following configuration steps directly on the local server console.
Open System Utilities
Power on or restart the server. During startup, press F9 to open System Utilities.
Prepare the SSDs for RAID1
Open:
System Utilities > System Configuration > HPE MR216io Gen11 > Main Menu > Configuration Management > Create Logical Drive
If the SSDs are listed as JBOD drives, select both internal SSDs and confirm the selection so that they can be used for the logical drive.
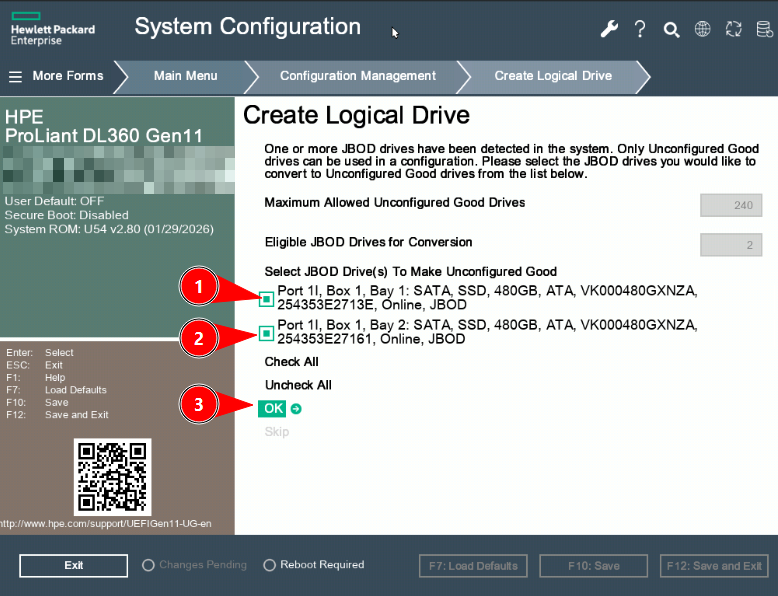
Select both internal SSDs and confirm the selection.
Create the RAID1 Logical Drive
Set Select RAID Level to RAID1.
Choose Select Drives and verify that both internal SSDs are selected. Then select Save Configuration.
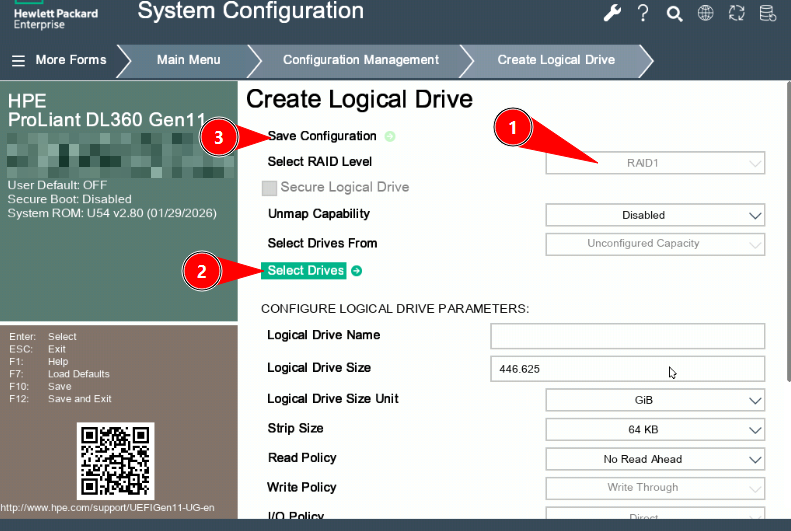
Select RAID1, verify both drives, and save the configuration.
Confirm the configuration. When the logical drive has been created successfully, press Esc to return to the previous menu.
Apply the Low Latency Workload Profile
In System Utilities, open:
System Configuration > BIOS/Platform Configuration (RBSU) > Workload Profile
Select Low Latency and confirm the message.
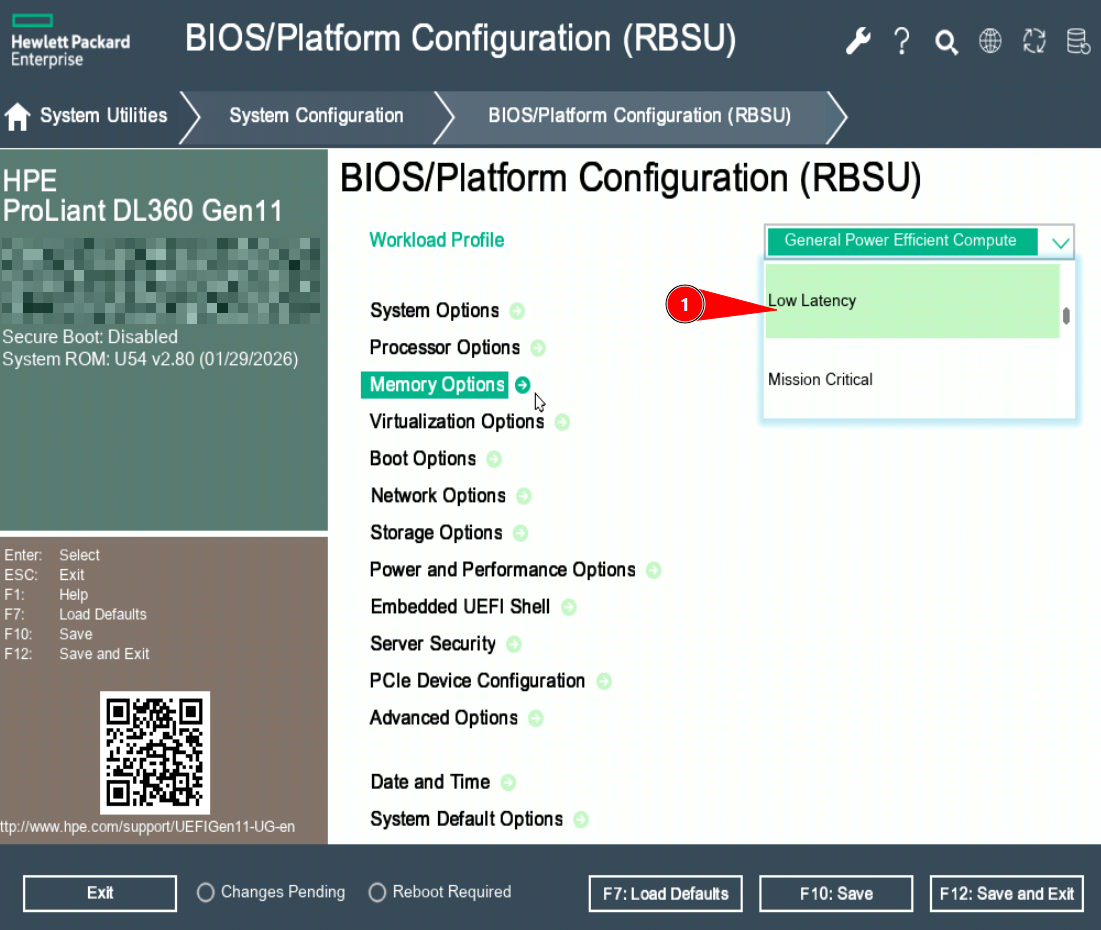
Select the Low Latency workload profile.
Press F12 to save the configuration and exit. The server restarts.
Change the Workload Profile to Custom
During the next startup, press F9 again and open:
System Utilities > System Configuration > BIOS/Platform Configuration (RBSU) > Workload Profile
Select Custom, which is the last entry in the list, and confirm the message.
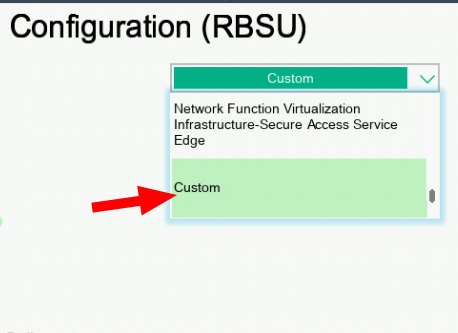
Select Custom as the workload profile.
Configure Virtualization Options
Open Virtualization Options and configure the settings as follows:
- Intel(R) Virtualization Technology (Intel VT): Disabled
- Intel(R) VT-d: Enabled
- Access Control Service: Disabled
- SR-IOV: Disabled
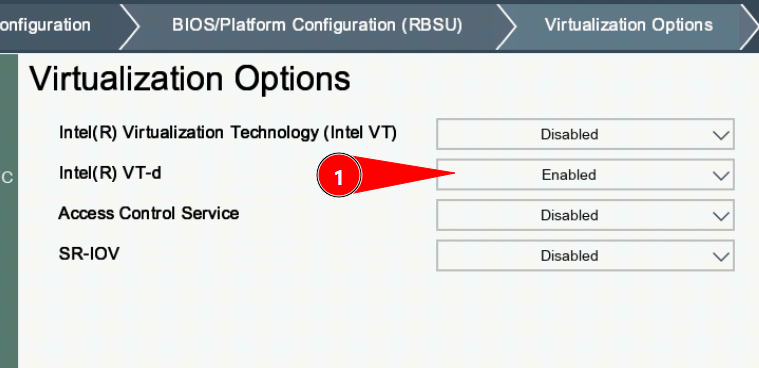
Enable Intel VT-d and keep the other virtualization options disabled.
Press F12 to save the configuration and exit.
2. flexAIserver Software Installation
The flexAIserver software can be installed either from a bootable USB drive or remotely through HPE iLO Virtual Media.
Once the Jünger installation menu appears, the remaining installation procedure is identical for both methods.
Method A – USB Drive
Create a Bootable USB Drive
Use a suitable image-writing tool such as balenaEtcher to write the flexAIserver ISO image to the USB drive:
The USB drive will be erased.
- Insert the USB drive into a front USB port.
- Connect a keyboard.
- Power on or restart the server.
- During startup, press F11 to open the Boot Menu.
- Select the UEFI entry corresponding to the USB installation drive.
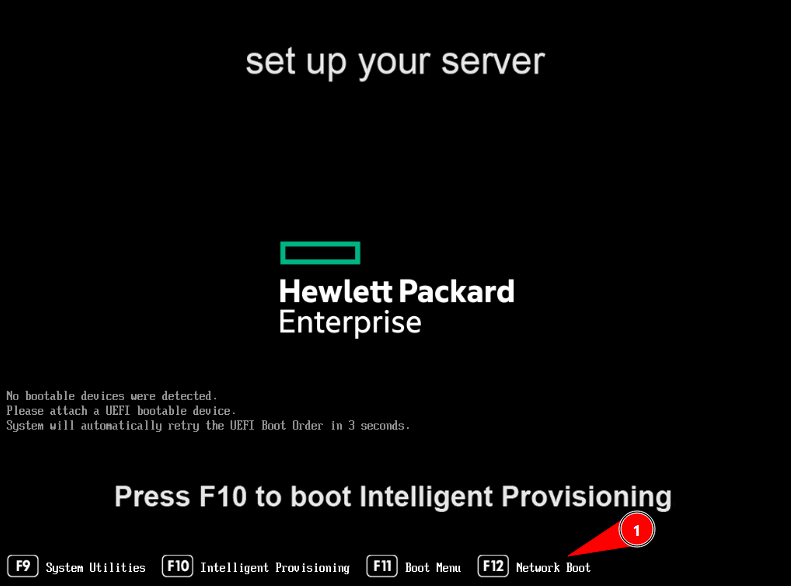
Press F11 during startup and select the USB installation media.
Continue with Installation Procedure – Applies to Both Methods below.
Method B – HPE iLO Virtual Media
Map the ISO as Virtual Media
Make sure the server is powered off. If it is currently running, shut it down using the iLO power controls or the physical front-panel power button.
Launch the Remote Console as described above.
In the Remote Console:
- Select Virtual Media.
- Select CD/DVD.
- Select *Local .iso file.
- Select the flexAIserver ISO image.
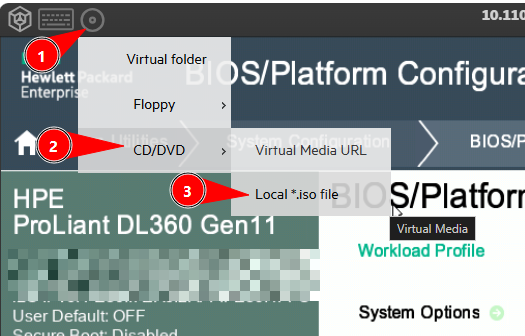
Open Virtual Media, select CD/DVD, and map the flexAIserver ISO image.
Boot from the Virtual Media
Keep the Remote Console open during installation. Closing it may disconnect the virtual installation media.
Power on the server using Power > Momentary Press in iLO.
Wait for the Jünger installation menu to appear.
If the server does not boot from the virtual media automatically, press F11 during startup, open the Boot Menu, and select the virtual CD/DVD or corresponding virtual-media source.
Installation Procedure – Applies to Both Methods
The following steps are identical whether the installation media is connected by USB or through HPE iLO.
Start the flexAIserver Installer
When the Jünger installation menu appears on the local display or in the Remote Console, select the available installation option, such as Graphical Install or Install, and press Enter.
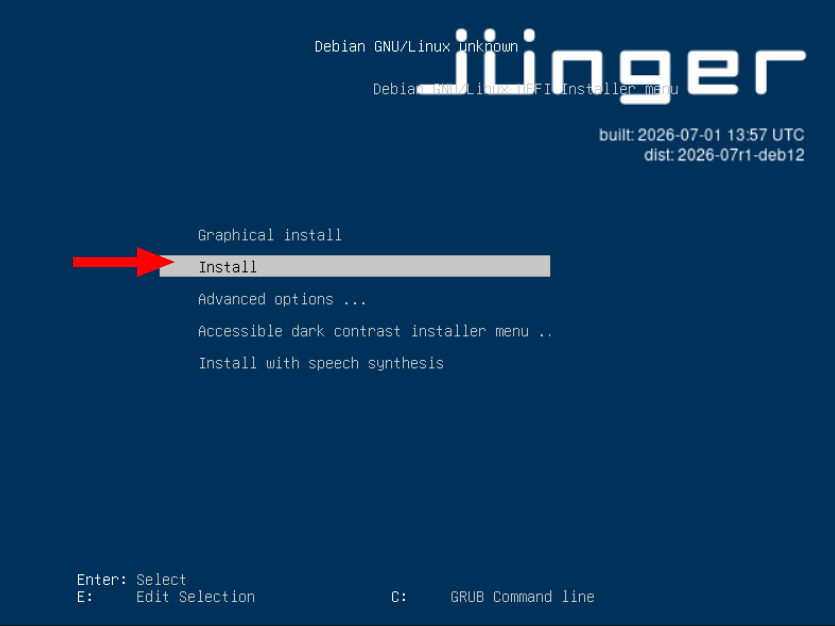
Select the installation option and press Enter.
Note - The Debian version and build information shown in the following example screenshots may differ from the delivered flexAIserver ISO. The installation procedure remains the same.
Set the Hostname
When prompted, enter the hostname for the flexAIserver.
For example:
flexAIserver-00119
The final digits of the device serial number may be used, or another hostname can be chosen according to the naming convention of the network environment.
Enter the hostname for the flexAIserver.
Select the Target Disk
Select the internal RAID1 logical volume created during the initial server configuration.
Do not select the USB installation drive.
Important - The device names and capacities shown on the HPE server may differ from the generic example below. Identify the internal RAID1 logical volume by its capacity and controller information before continuing.
Select the internal RAID1 logical volume, not the USB installation drive.
Warning - All existing data on the selected target disk will be erased during installation.
Finish the Installation
When the installer reports that the installation is complete:
- USB installation: Remove the USB drive before continuing.
- HPE iLO installation: Unmount or disconnect the virtual CD/DVD image before continuing. Keep the Remote Console open until the reboot has completed.
Select Continue to reboot into the newly installed system.
Installation complete – remove the physical or virtual installation media before rebooting.
After the server has booted, continue with the flexAIserver Initial Setup.
Safety Information
Critical information - Please read the following safety information carefully before installing, operating, or servicing the flexAIserver hardware.
Electrical Safety
- Connect the server only to mains outlets that provide a protective earth connection.
- Make sure that the mains power cords remain accessible so that the server can be disconnected from mains power when required.
- Servers equipped with redundant power supplies use separate mains connections for each power supply. All connected power cords must be disconnected to completely remove mains power from the server.
- Use only power cords that are suitable for the server hardware and approved for use in the country or region of installation.
- Do not expose the server to dripping or splashing water and do not place containers filled with liquid on or directly above the unit.
Note - The exact mains connections, power controls, and electrical specifications depend on the installed server hardware. Refer to the safety and installation documentation supplied by the server manufacturer.
Service Safety
Service work must only be carried out by suitably qualified personnel.
Before opening or servicing the server:
- Shut down the operating system when possible.
- Switch off the server.
- Disconnect all mains power cords.
- Make sure that the power cords cannot be reconnected accidentally while service work is in progress.
Do not perform internal service work while the server is connected to mains power unless the procedure is explicitly specified by the server manufacturer and is carried out by suitably qualified personnel.
Installation and Operation
- Install the server in a standard 19-inch equipment rack using the rack-mounting hardware specified for the server model.
- Make sure that the server is adequately supported and securely installed in the rack.
- The server is actively cooled. Keep all ventilation openings clear and maintain the airflow specified by the server manufacturer.
- Additional empty rack units above or below the server are normally not required unless specified by the server manufacturer or by the cooling concept of the installation.
- Do not operate the server with covers, panels, or other safety components removed.
- If the server, power cords, connectors, or other components appear damaged, disconnect the server from mains power and have it inspected by qualified service personnel before further use.
Internal Battery
Server hardware may contain one or more internal lithium batteries.
Warning - Internal batteries must only be replaced with the type specified by the server manufacturer. Incorrect replacement or installation may present a risk of fire or explosion. Follow the manufacturer's instructions for replacement and disposal.
Manufacturer Safety Information
The flexAIserver software may be supplied on different qualified server platforms. Hardware-specific safety instructions, rack-mounting requirements, environmental limits, servicing procedures, and regulatory information are provided by the respective server manufacturer.
Important - Always follow the safety and installation documentation supplied with the installed server hardware. Where hardware-specific instructions differ from the general information on this page, the server manufacturer's instructions take precedence.